JOLU’S Satellite Pointer
Many RVers use tripods to setup their dish for tv reception. Sometimes even seasoned dish users finds it difficult to get that initial coarse alignment on Satellite 101 for Directv. With the 5 lnb dish for HD programming it can be even more of a challenge to hit the satellite.
Materials
Here is a simple Satellite Pointer you can make yourself for under $15. You will need to buy a Silva Polaris Compass $10.84 (WalMart), 2 – 2” X ¾” PVC Reducing Flush Bushings (Home Depot plumbing dept.) $1.09 ea., 2 Nylon Push in fasteners 315” size $.57 (Home Depot). You can use your favorite compass if it has a dial to dial in the Azimuth.
How to Assemble
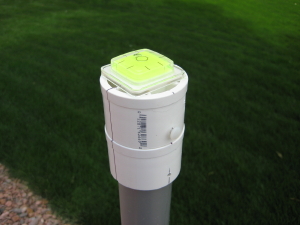
Stack and glue the bushings together. You need to have a ¾” fitting at the top and a 2” fitting on the bottom.
Draw a line on each side of the bushings from any two centering ribs at the top of the bushing using a square and extend to bottom of bushings. You will use these lines later to align your compass and dish Azimuth.
The Compass can be glued, double sided taped, or rubber band to the top of the bushings. The compass will need to be aligned to the lines on the bushings. Drill a 5/32 hole on opposite sides of lines on the top bushing and insert push in fasteners to loop rubber bands over if you use rubber bands.
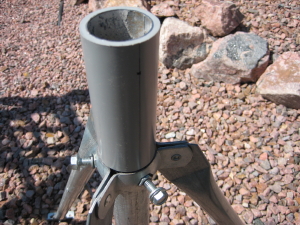
This bushing assembly with the 2” fitting on the bottom will slip over the top of the 2” mast (mast is slightly less than 2”) currently used for the AU9 Slimline dish and can also be used for the 1 5/8” mast for the smaller dish and can sit on top of any 2” ID mast.
How to Use
Obtain your Azimuth and Elevation for the zip code you are located in and set the Elevation on the dish bracket.
Set the Azimuth heading with the compass dial.
Place the bushing assembly on top of the mast with the compass aligned to the lines drawn on the sides and top of the bushings.
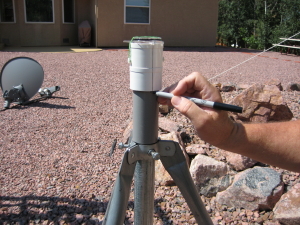
Rotate the bushing assembly and line up the compass North pointer to the North arrow. Make a pen (Sharpie) tic mark at the bottom of the bushings where one of the lines intersects the mast. Then remove the bushing assembly. You will need to extend the tic mark down the mast to be visible once dish assembly is slipped over the top of the mast.
Now determine the center of the dish and mount that goes over the mast and make a mark. You will always use this mark in the future.
Place dish assembly on mast and rotate the dish assembly and line up the tic marks. You are now on the satellite and close enough to be able to fine tune the signal.
Notes & Tips
This Pointer will work with any satellite as long as you dial the coordinates into the compass.
You use two bushings stacked so the compass will not be disturbed by the metal mast.
A bubble level can also be placed on top of the bushings and used to plumb the mast.
A good program you can download for free to get coordinates for different zip codes comes to us from the good folks at http://www.datastormusers.com/lookangle.cfm. The program is easy to use and also gives the skew (tilt) you can use for the 5 lnb dish. Be sure to down load the zip code file into DSLookAngle folder in your computer program files. Another program you can download for finding satellite coordinates is at http://vps.arachnoid.com/satfinder/
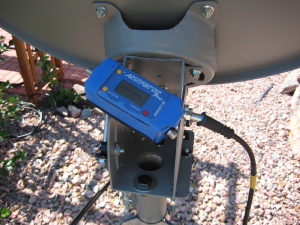
Remember if you are using the HD 5lnb AU9 Slimline dish it is important to get the mast plumb so you can fine tune the dish and receive the proper satellites for Standard and High Definition programming. Aligning the dish is more complex than the standard round dish and a signal meter is highly recommended. “You can do it”. You can view meters at:
http://search.solidsignal.com/?q=meters&site=com&new_search=1&I1.x=7&I1.y=18.
I use the Accutrac22 Pro most always for aligning.
Dish Mounting Mast
Don’t throw away that old tripod and the 1 5/8” galvanized mast you are using for your round dish. You can convert that mast to a 2” mast by slipping a 5” long sleeve of 1 ½” gray schedule 40 non-metallic electrical conduit over the top of the mast. You will need to heat the 5” sleeve in your oven at 325 degrees for about 5 minutes. It will then slip over the 1 5/8” mast with ease and will cool and shrink to the mast for a firm fit. You now have a 2” mast for the Slimline dish. You will want to anchor the tripod well. View the AU9 Slimline dish, installation video and manual at: http://www.solidsignal.com/satellite/at9_install_videos.asp.